Send transactions to QuickBooks Online
Video: Sending Invoices and Payments from CCH iFirm to QuickBooks Online
Security - Enable 3rd Party Integrations
For invoices that have been sent to QuickBooks Online you can add payments, credits, write-offs, and discounts and send those transactions to QuickBooks Online. For any transactions that were not sent to QuickBooks Online when they were created, you can edit those transactions and send them to QuickBooks Online.
Transactions can only be linked to a single contact. If the transaction belongs to multiple contacts (Contacts > Groups), then each contact must have a separate transaction totaling the amount of the transaction.
- Click Time and Billing > Accounts Receivable.
- Click Add Transaction.
- Select the date.
- Select Payment as the transaction type.
- Select the payment type:
- If you select Check as the payment type, enter the account name, bank and branch.
- If you do not want to re-enter these details the next time you add a check payment for this client, select the Save bank details to receivables check box.
- Select the receivable using EITHER of these methods:
- Type the first few letters of their name in the Receivable field, then select them from the list.
- Click the Search button
 , then locate and select the required client.
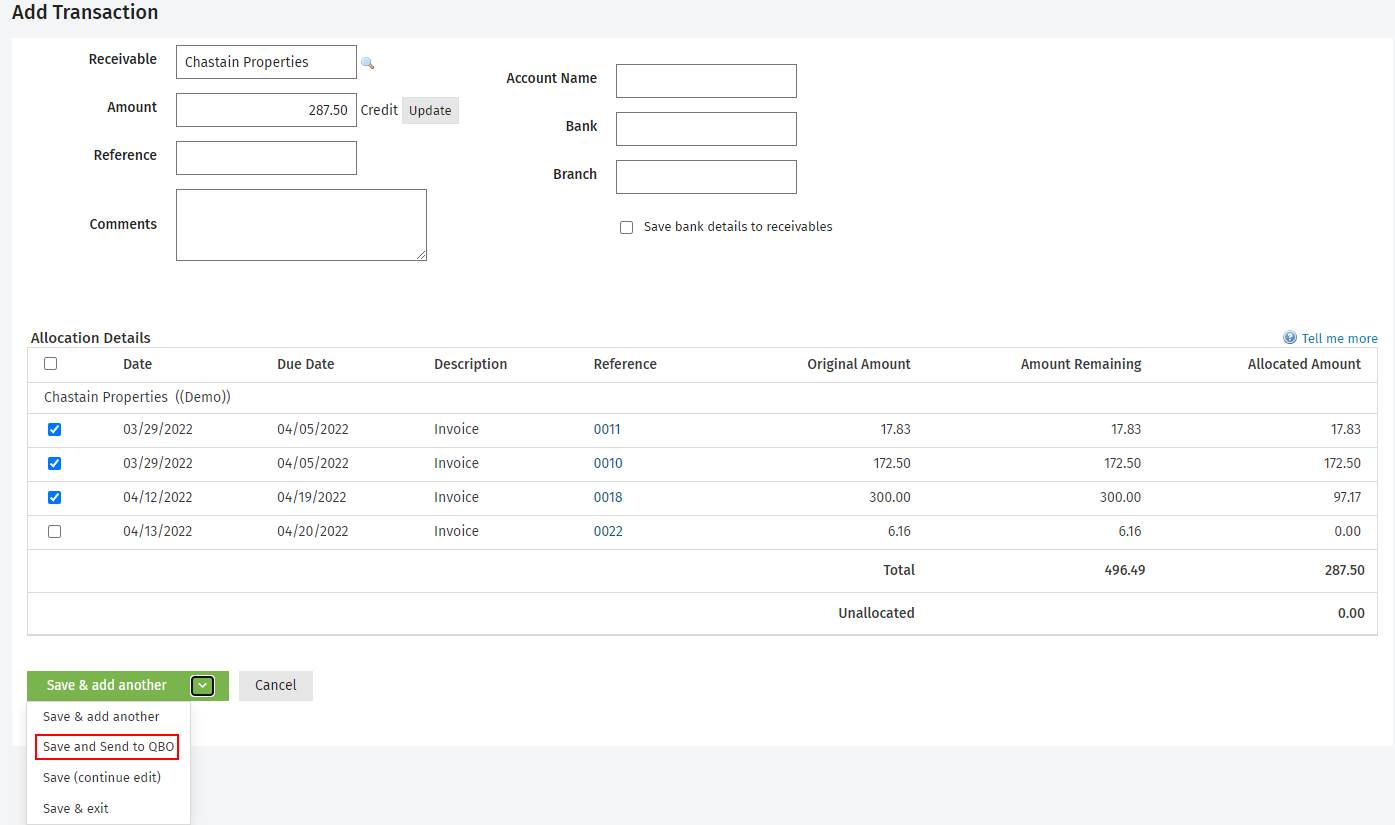
 - Enter the amount.
- Click Update or move to the next field to update the screen.
- Enter a reference for the transaction.
- Enter comments about the transaction, if required.
- Adjust the automatic allocations, if applicable. If no allocation is selected, the payment is assigned to the customer rather than the invoice in QuickBooks Online.
- Click the arrow on the Save & add another button, then select Save and Send to QBO. This option is only visible if you are connected to your QuickBooks Online site.

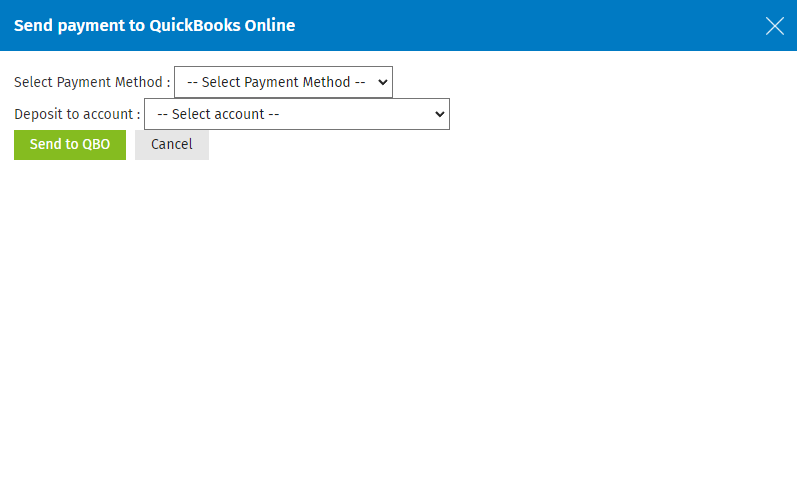
- Select the payment method from the drop-down list.
- Select the account for the deposit of account in QuickBooks Online from the drop-down list.

- Click Send to QBO.
When a credit transaction is entered in CCH iFirm and then sent to QuickBooks Online, a credit memo and payment are both shown on the Transaction List and is linked to the invoice in QuickBooks Online for that customer.
- Click Time and Billing > Accounts Receivable.
- Click Add Transaction.
- Select the date.
- Select Credit as the transaction type.
- Select the receivable using EITHER of these methods:
- Enter the first few letters of their name in the Receivable field, then select them from the list.
- Click the search icon, then locate and select the required client.
- Enter the credit amount paid.
- Click Update or move to the next field to update the screen.
- Enter a reference for the credit.
- Enter comments about the credit, if required.
- Adjust the automatic allocations, if applicable. If no allocation is selected, the credit is assigned to the customer rather than the invoice in QuickBooks Online.
- Click the arrow on the Save & add another button, then select Save and Send to QBO. This option is only visible if you are connected to your QuickBooks Online site.
The credit transaction from CCH iFirm will be displayed on the invoice as a payment in QuickBooks Online.
If you have invoiced a client and they have declined to pay it, you can write off the invoice. To do this you open the receivable and add a write-off transaction for the relevant amount (including tax if applicable). When you do this the outstanding invoices for the client will be listed. A transaction will be added to the receivables account that takes the invoice amount off their amount due but still keeps the invoice in the system for historical reporting.
- Click Practice Management > Accounts Receivable.
- Click Add Transaction.
- Select the date.
- Select Write-off as the transaction type.
- Select the receivable using EITHER of these methods:
- Enter the first few letters of their name in the Receivable field, then select them from the list.
- Click the search icon, then locate and select the required client.
- Enter the write-off amount paid.
- Click Update or move to the next field to update the screen.
- Enter a reference for the write-off .
- Enter comments about the write-off, if required.
- Adjust the automatic allocations, if applicable. If no allocation is selected, the write-off is assigned to the customer rather than the invoice in QuickBooks Online.
- Click the arrow on the Save & add another button, then select Save and Send to QBO. This option is only visible if you are connected to your QuickBooks Online site.
The write-off transaction will be displayed on the invoice as a payment in QuickBooks Online.
- Click Practice Management > Accounts Receivable.
- Click Add Transaction.
- Select the date.
- Select Discount as the transaction type.
- Select the receivable using EITHER of these methods:
- Enter the first few letters of their name in the Receivable field, then select them from the list.
- Click the search icon, then locate and select the required client.
- Enter the credit amount paid.
- Click Update or move to the next field to update the screen.
- Enter a reference for the credit.
- Enter comments about the credit, if required.
- Adjust the automatic allocations, if applicable. If no allocation is selected, the discount is assigned to the customer rather than the invoice in QuickBooks Online.
- Click the arrow on the Save & add another button, then select Save and Send to QBO. This option is only visible if you are connected to your QuickBooks Online site.
The discount transaction from CCH iFirm will be displayed on the invoice as a payment in QuickBooks Online.